One of my most popular posts is How to Link NextGEN Gallery Images to an Individual Page or Post in WordPress. Unfortunately, this article was written almost 6 years ago and is outdated as there have been a lot of changes to NextGen in that time.
NextGen Gallery was purchased by Photocrati three years ago and underwent some huge changes. Many of you who used my instructions to link a gallery image to a post or page found that the linking no longer worked and that the instructions were no longer accurate. For many people, the best thing to do was go back to the pre 2.0 version of NextGen and not update it. Over time, however, that becomes a security risk and there are issues with the old version of NextGen and the newest versions of WordPress. For example, on some installations I have found that the Visual toolbar no longer works correctly when the old version of NextGen is installed and activated.
Fortunately, however, NextGen 2.0+ can be linked to a post or page. Here are the full updated instructions on how to do that.
Install NextGen Gallery
You must have the NextGen Gallery 2.0+ installed and at least one gallery with one image in it created to add the custom fields and modify the plugin files so that you can link NextGen Gallery to a post or page.
Install NextGen Custom Fields
**You can also refer to the instructions here.
Install and activate the NextGen Custom Fields plugin
The plugin requires a second level of activation. Go to the following URL and change example.com to your domain name.
http://www.example.com/wp-admin/admin.php?page=nextgen-gallery-custom-fields/ngg-custom-fields.php&mode=upgrade
You will now have a NGG Custom Fields menu in the WordPress admin. Click on that.
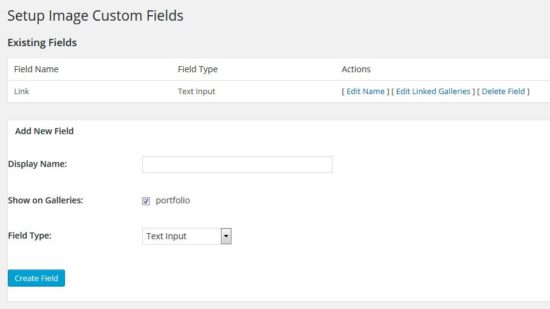
Choose Image Custom Fields.
Name the field and designate what gallery it will be used in. In my example, the name of the field is Link, it is a text field, and it is being used in the portfolio gallery
Edit and Link NextGen Gallery to a Post or Page
There are three files that you may want to edit; gallery.php, gallery-caption.php, and gallery-carousel.php. In this example I will only be editing gallery.php. You will need ftp to download the files so you can edit them and then upload them to your theme directory so that your edits will be saved even when the plugin is updated. The files are located in wp-content/plugins/nextgen-gallery/products/photocrati_nextgen/modules/ngglegacy/view
Around line 34 gallery.php contains the following:
<?php echo nextgen_esc_url($image->imageURL) ?>
Edit that to
<?php echo $image->ngg_custom_fields["Link"]; ?>
Make sure you change Link to whatever you named your custom field.
Save Edited Files in Theme Directory
Create a folder in your theme directory called nggallery. This must go within the theme you are actively using. For example, if you are using twentyfifteen you would put the folder in wp-content/themes/twentyfifteen/nggallery. Upload the edited files to this new directory. By placing the files here, they will not be overwritten when the NextGen plugin is updated.
Add Links
In your gallery, you will now have a new field called Link. Add the URL to the post or page that you would like the image to link to.
Turn Off Lightbox
Lightbox must be turned off in NextGen Gallery for the link to work. Go to Gallery > Other Options > Lightbox Effects > change to none.
Adding Gallery
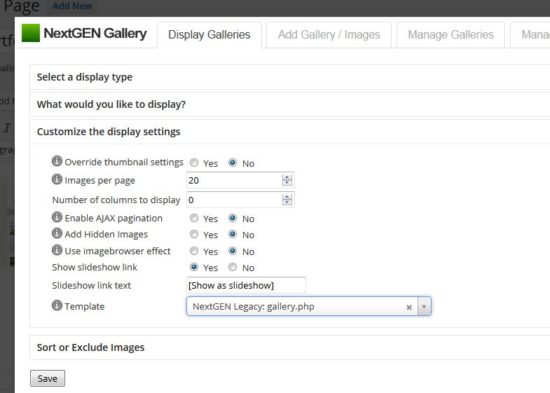
When you add a gallery to a page, make sure you select the correct template. This is under the Customize the Display settings section. You will want to select NextGEN Legacy gallery.php
Future Articles
The pre version 2.0 of NextGen can be updated using the Nextcellent Gallery – NextGen Legacy plugin. In an upcoming post I will discuss how to upgrade to that plugin if you are still using the old version of NextGen and don’t want to use the 2.0 version by Photocrati.
Photo credit: arthurjohnpicton


